C_S4CPB Pdf Free & C_S4CPB Exam Materials
Wiki Article
Our website gives detailed guidance to our candidates for the preparations of C_S4CPB actual test and lead them toward the direction of success. Each question in C_S4CPB pass guide is certified by our senior IT experts to improve candidates' ability and skills. The quality of training materials and the price of our C_S4CPB Dumps Torrent are all created for your benefit. Just add it to your cart.
The excellent SAP C_S4CPB practice exam from RealExamFree can help you realize your goal of passing the SAP C_S4CPB certification exam on your very first attempt. Most people find it difficult to find excellent SAP C_S4CPB Exam Dumps that can help them prepare for the actual SAP Certified - Implementation Consultant - SAP S/4HANA Cloud Public Edition (C_S4CPB_2602) C_S4CPB exam.
C_S4CPB Exam Materials - Latest C_S4CPB Exam Book
As the industry has been developing more rapidly, our C_S4CPB exam dumps have to be updated at irregular intervals in case of keeping pace with changes. To give you a better using environment, our experts have specialized in the technology with the system upgraded to offer you the latest C_S4CPB Exam practices. What’s more, we won’t charge you in one-year cooperation; if you are pleased with it, we may have further cooperation. We will inform you of the latest preferential activities about our C_S4CPB test braindumps to express our gratitude towards your trust.
SAP Certified - Implementation Consultant - SAP S/4HANA Cloud Public Edition (C_S4CPB_2602) Sample Questions (Q11-Q16):
NEW QUESTION # 11
SIMULATION
Create a Custom Business Role with Restrictions
Business Scenario:
You are building a custom business role with restrictions to ensure the end users assigned the role have only the minimum level of access necessary to complete their core job tasks. The end users are project managers based in the United States. They should only be able to create projects, edit projects, and access projects that are occurring in the United States. They should not be able to staff any resources outside of the United States. Write, Read, and Value Help access should be restricted to only the United States for all relevant fields.
Prerequisites:
Note: In the task below, always replace ###### with the last 6 digits of your group number.
Note: Make sure to use the EXACT names/values/spaces as they are listed in the task. Even forgetting a space or a number will cause the validation of the task to fail and be marked as incorrect.
Task:
Use the template for the business role Project Manager - Professional Services (SAP_BR_PROJECT_MANAGER_PROF) to create a new business role with the following information: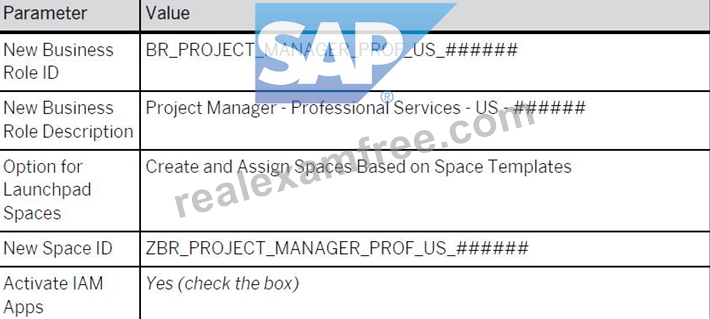
Answer:
Explanation:
See Explanation below for all solution
Explanation:
Objective
The purpose of this task is to create a custom business role for project managers in the United States by using the standard SAP template role Project Manager - Professional Services and then restricting the role so users only have the minimum access needed for their job.
The template role used is:
Template Business Role ID: SAP_BR_PROJECT_MANAGER_PROF
Template Business Role Description: Project Manager - Professional Services The new custom role must be created with exact values defined in the task.
Business Scenario Explanation
In this simulation, you are building a restricted custom role for project managers who work only in the United States.
The goal is to ensure that these end users:
can create and edit projects,
can access only projects occurring in the United States,
cannot work with projects or staffing outside the US,
have only the minimum level of authorization needed.
This is done in two major parts:
Create a new custom business role from the standard SAP template
Restrict the role values so only US-related data is allowed
Important Notes
Always replace ###### with the last 6 digits of your group number.
Every value must be entered exactly as shown.
Even one missing space or incorrect character can cause the simulation validation to fail.
You must also create and assign a launchpad space as part of the custom role creation.
Required Values for Role Creation
Use the following values exactly as shown in the task image.
Parameter
Value
New Business Role ID
BR_PROJECT_MANAGER_PROF_US_######
New Business Role Description
Project Manager - Professional Services - US - ######
Option for Launchpad Spaces
Create and Assign Spaces Based on Space Templates
New Space ID
ZBR_PROJECT_MANAGER_PROF_US_######
Activate IAM Apps
Yes (check the box)
Example
If your suffix is 000457, the values become:
BR_PROJECT_MANAGER_PROF_US_000457
Project Manager - Professional Services - US - 000457
ZBR_PROJECT_MANAGER_PROF_US_000457
Detailed Step-by-Step Procedure
Part 1: Open the standard template role
Step 1: Open the app "Maintain Business Roles"
From the SAP S/4HANA Cloud launchpad:
Log in to SAP S/4HANA Cloud.
Use the app search.
Search for:
Maintain Business Roles
Open the app.
Explanation:
This app is used to maintain standard and custom business roles.
Because this task requires creating a custom role from an existing template, this is the correct starting app.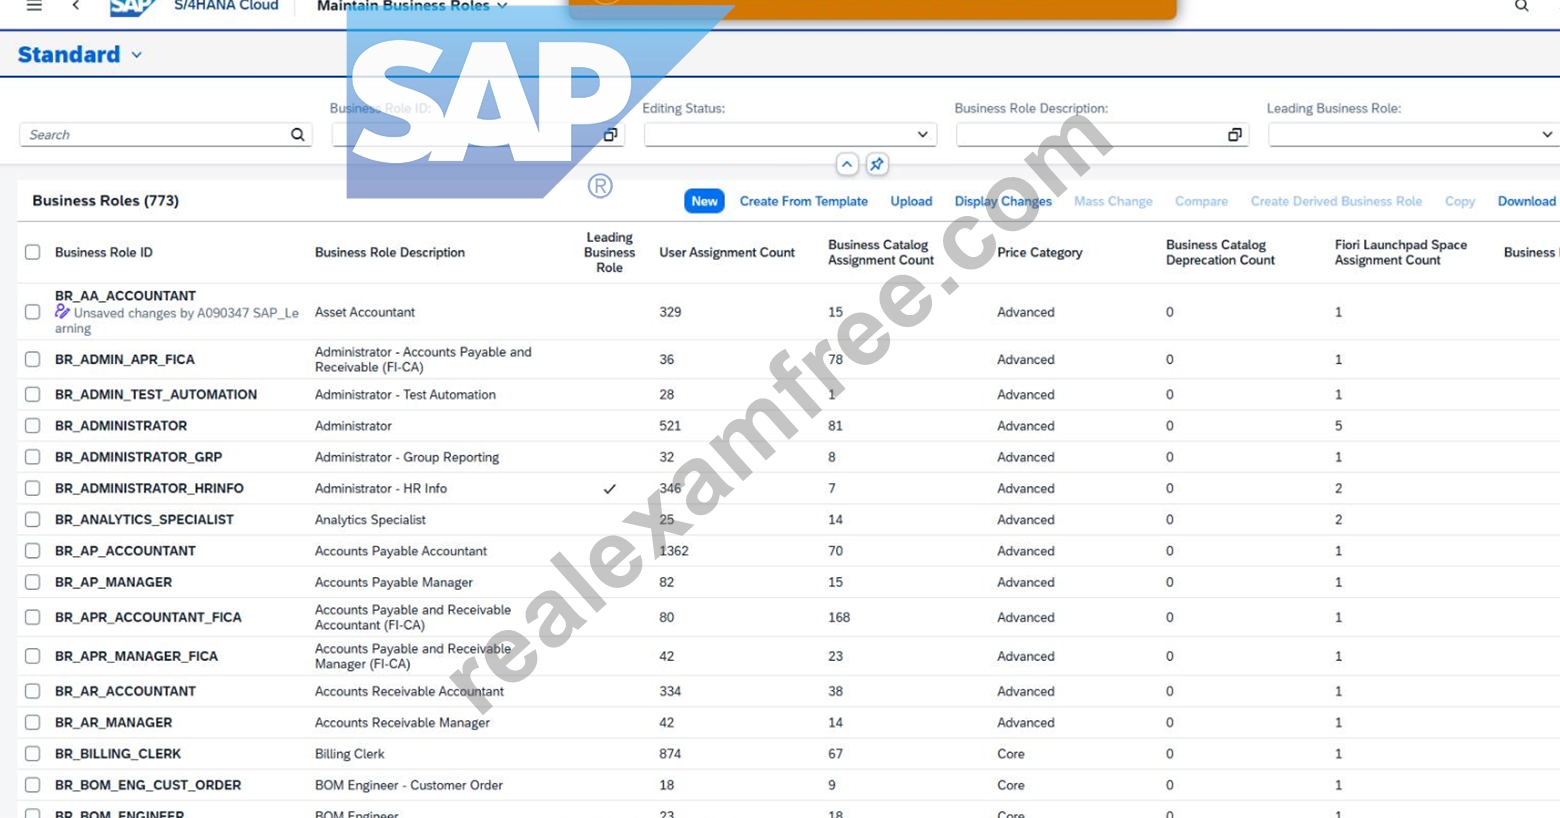
Step 2: Search for the template role
Inside Maintain Business Roles:
In the search/filter area, search for:
SAP_BR_PROJECT_MANAGER_PROF
or
Project Manager - Professional Services
Open the standard SAP template role.
Explanation:
You must start from the standard template role because the task explicitly says to use the template for:
Project Manager - Professional Services
SAP_BR_PROJECT_MANAGER_PROF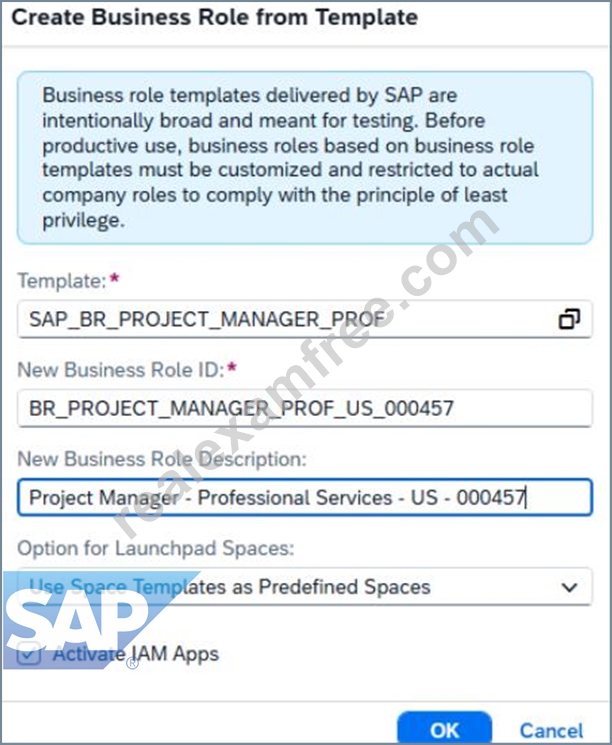
Part 2: Create the custom role from the template
Step 3: Click "Create Derived Business Role"
On the template role page:
Click:
Create Derived Business Role
Explanation:
This function creates a customer-specific copy based on the standard SAP business role template.
It preserves the delivered role content but allows you to define your own role ID, description, restrictions, and launchpad space.
Step 4: Enter the custom role information
In the creation popup, enter the values exactly as follows:
Template = SAP_BR_PROJECT_MANAGER_PROF
New Business Role ID = BR_PROJECT_MANAGER_PROF_US_######
New Business Role Description = Project Manager - Professional Services - US - ###### Option for Launchpad Spaces = Create and Assign Spaces Based on Space Templates New Space ID = ZBR_PROJECT_MANAGER_PROF_US_###### Activate IAM Apps = checked Explanation:
These values define the new custom project manager role that will later be restricted to US-only access.
The space option is important because the task expects the role to include its own launchpad space.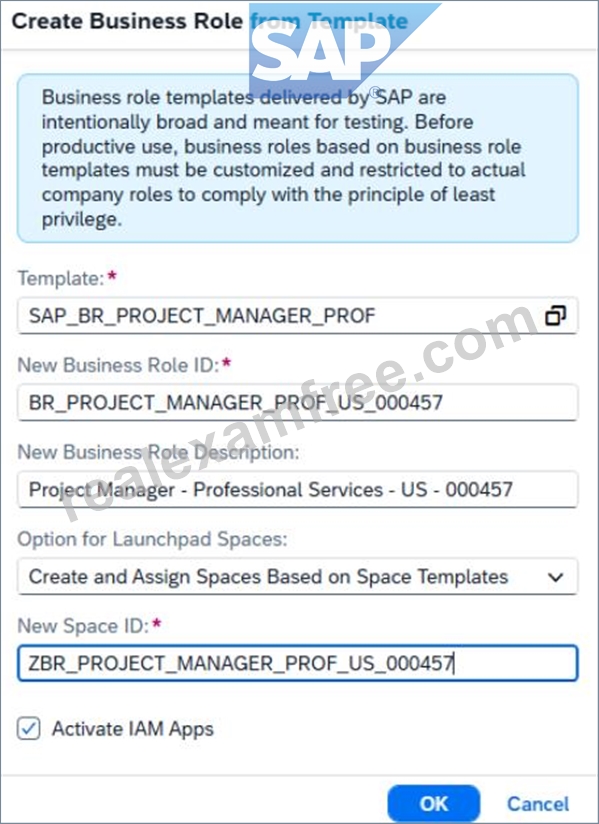
Step 5: Confirm creation
Click OK
Explanation:
SAP now creates the custom role derived from the template and assigns the new launchpad space at the same time.
Part 3: Verify the newly created custom role
Step 6: Review the new custom role
After creation, SAP opens the new custom role.
Verify:
Business Role ID = BR_PROJECT_MANAGER_PROF_US_######
Business Role Description = Project Manager - Professional Services - US - ###### Business Role Template ID = SAP_BR_PROJECT_MANAGER_PROF Explanation:
This confirms the derived role was created correctly from the right SAP template.
Part 4: Maintain role restrictions
Step 7: Open "Maintain Restrictions"
On the custom role page:
Click:
Maintain Restrictions
Explanation:
This is the most important part of the task.
You are not only creating a role - you are also limiting the role so it only allows US-related values.
Step 8: Understand the rule for restriction maintenance
The PDF/task logic is:
Fields explicitly listed in the restriction table → keep them Restricted and enter the required values All other fields not listed in the task table → set them to Not Maintained Explanation:
This is essential.
If extra fields remain restricted or blank, the role may not validate correctly.
The safest approach is:
only maintain the required fields,
mark all unrelated fields as Not Maintained.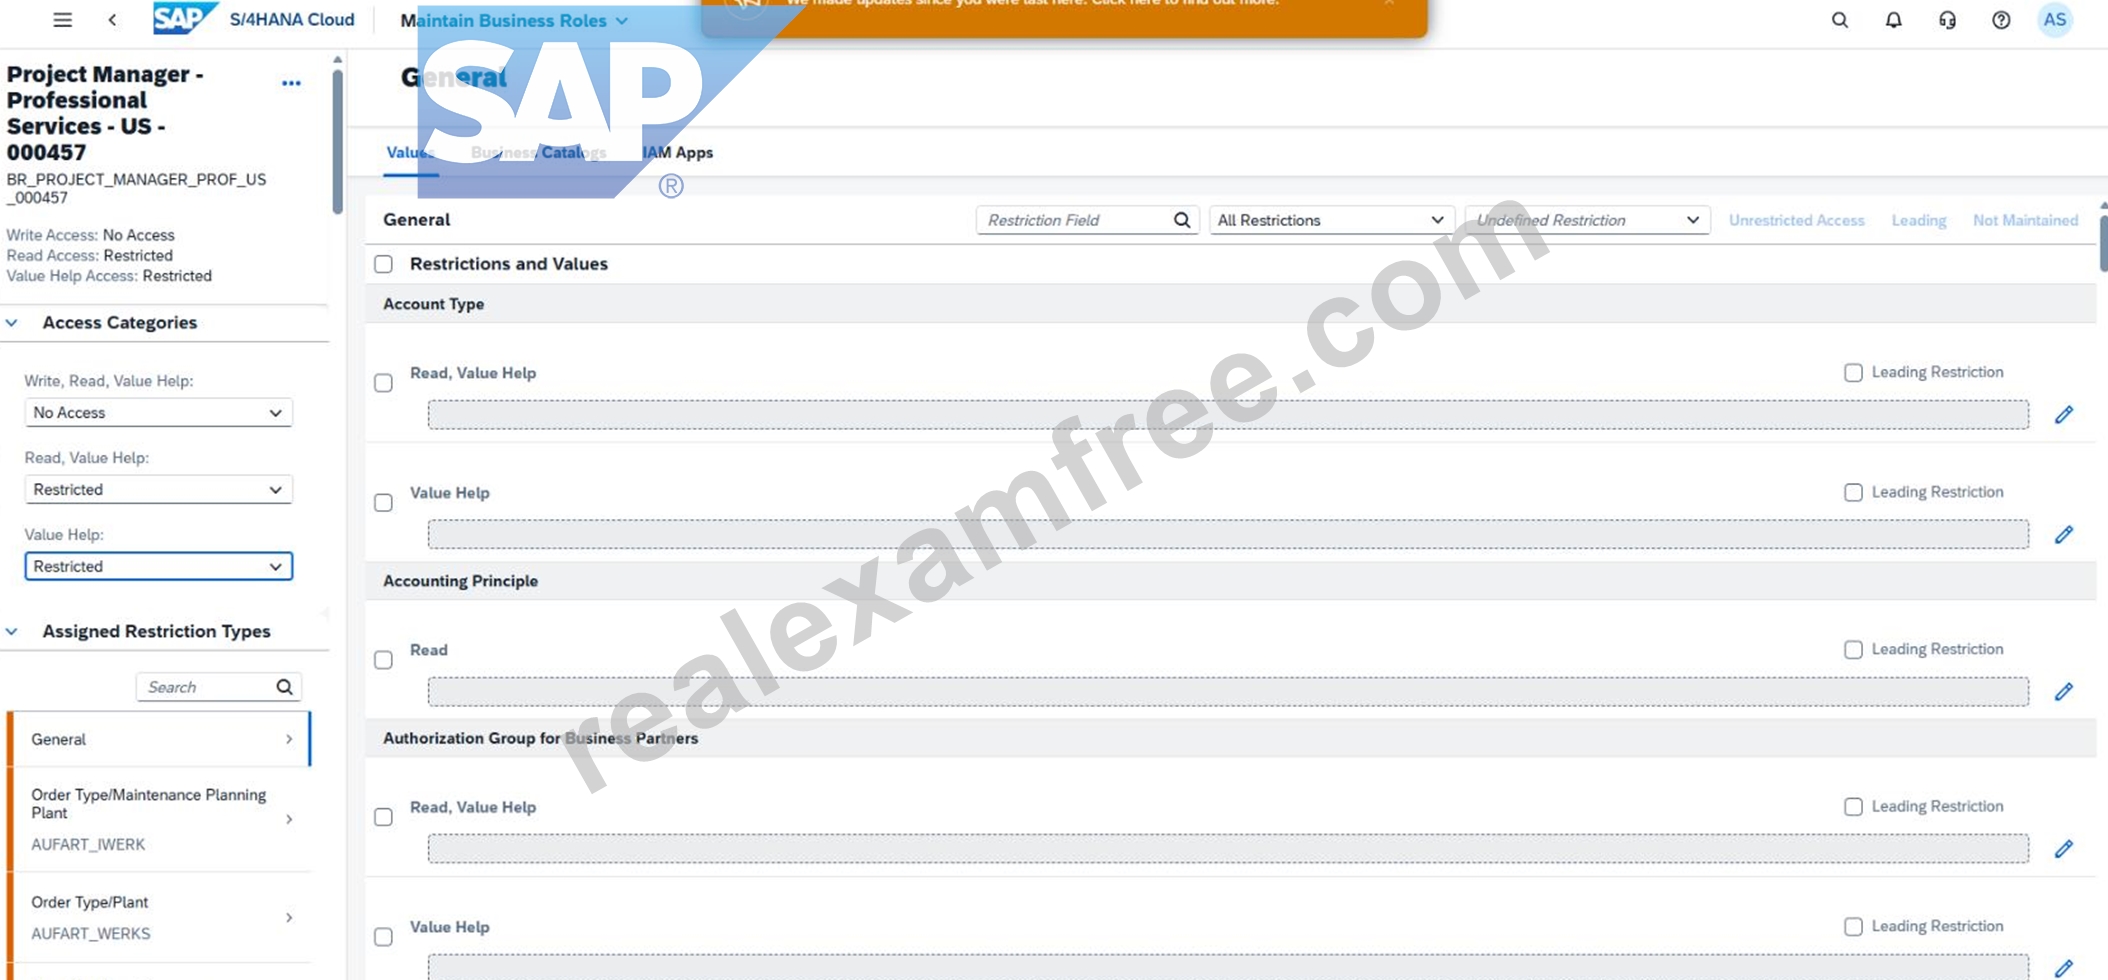
Part 5: Enter the required US restrictions
From your exercise run, the maintained values included restrictions such as:
Keep these kinds of fields restricted with US/1710 values where required Examples from your run:
Bank Country/Region Key
Read, Value Help = US
Value Help = US
Company Code
use 1710 only where the task table explicitly requires it
Purchasing Organization
use 1710 where required
Valuation Area
use 1710 where required
Explanation:
These are the exact business restrictions that make the role usable only for the intended geography and business scope.
Step 9: Set unrelated restriction fields to "Not Maintained"
For every field not included in the task's restriction list, choose:
Not Maintained
Examples from your screenshots included fields like:
Accounting Principle
Authorization Group for Business Partners
Billing Type
These should be Not Maintained unless they are explicitly listed in the task's required restriction table.
Explanation:
This removes unnecessary access and matches the task wording that all other fields should be set to Not Maintained.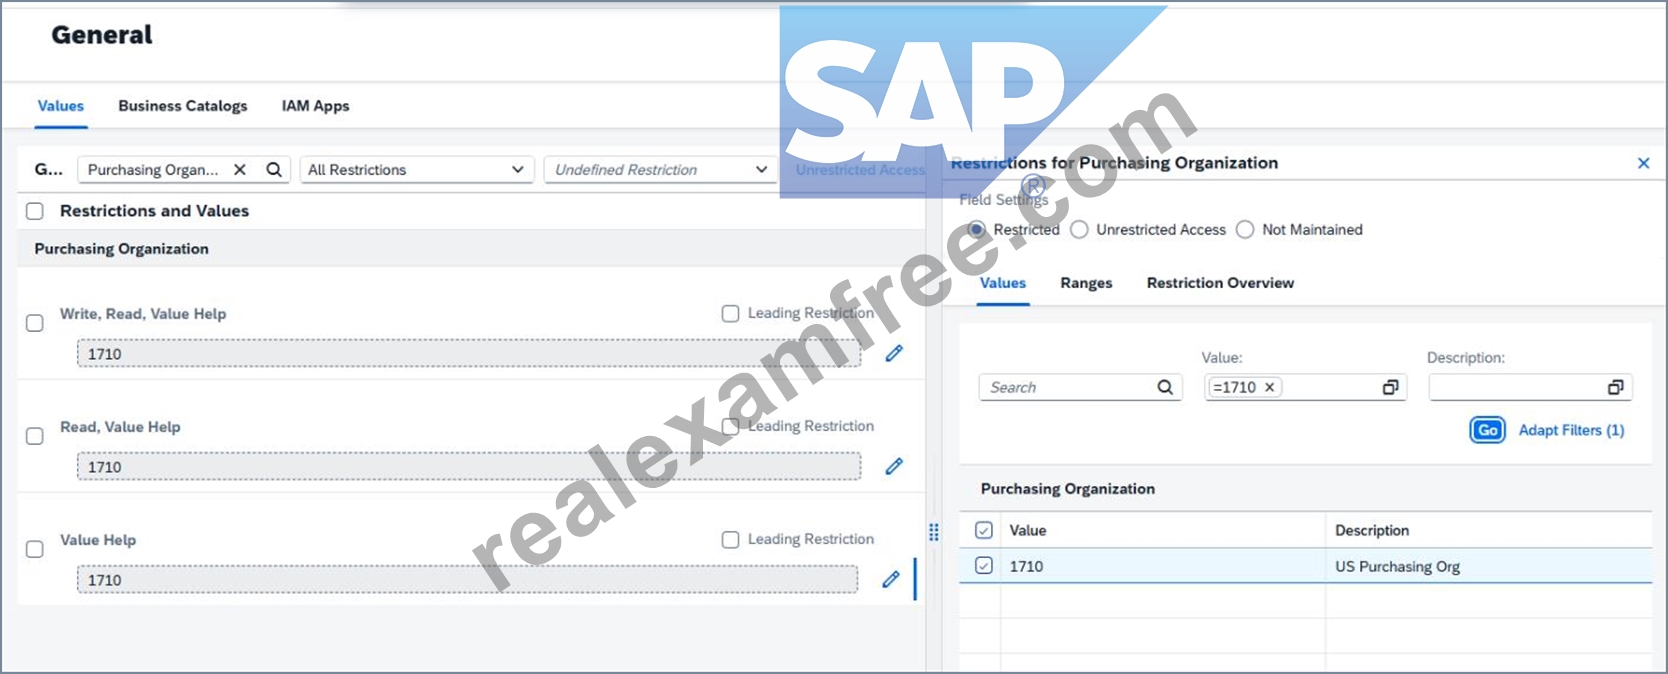
Step 10: Save the restrictions
After all required values are entered and unrelated fields are marked Not Maintained:
Click Save
Explanation:
This saves the restriction profile of the role.
If you do not save here, the role will remain incomplete or in draft.
Part 6: Verify launchpad space and page creation
Step 11: Go to Launchpad Spaces
In the custom role:
Open the tab:
Launchpad Spaces
Verify that the assigned space exists:
ZBR_PROJECT_MANAGER_PROF_US_######
Explanation:
Because you selected Create and Assign Spaces Based on Space Templates, SAP should have created and assigned the launchpad space automatically.
Step 12: Verify the created space
Open the assigned space and confirm:
the custom space exists,
it is customer-managed,
the pages are assigned correctly.
Explanation:
This proves that the new business role has its own launchpad structure as required by the task.
Expected Result
After this task is completed successfully:
a new custom role exists based on SAP_BR_PROJECT_MANAGER_PROF,
the role uses the exact required ID and description,
the role has a custom launchpad space,
IAM apps are activated,
restrictions are maintained for US-only access,
all irrelevant fields are set to Not Maintained,
the role is saved successfully.
NEW QUESTION # 12
SIMULATION
Migrate Bank Data
Business Scenario
You are responsible for migrating bank data into the SAP S/4HANA Cloud Public Edition system. You have determined the best method is Migrate Data Using Staging Tables, as you only have a couple banks to migrate.
Prerequisites:
Note:
In the task below, always replace ###### with the last 6 digits of your group number.
Note:
Make sure to use the EXACT names/values/spaces as they are listed in the task. Even forgetting a space or a number will cause the validation of the task to fail and be marked as incorrect.
Task:
Use the correct app to verify your data has been migrated successfully (see the documentation for the Bank migration object).
Answer:
Explanation:
See Explanation below for all solution
Explanation:
Objective
The purpose of this task is to use the correct SAP app to verify that the bank master data migrated in the previous task was created successfully in the target system.
The correct verification app is:
Manage Banks - Master Data
SAP's documentation for bank maintenance assigns this app to the bank master data role and uses it for maintaining and checking bank records, which matches the verification step after migration.
Business Scenario Explanation
In the previous migration tasks, you:
created the migration project,
selected the Bank migration object,
prepared and uploaded the bank data,
validated and transferred it to staging tables,
completed mapping tasks,
migrated the two bank records.
However, a migration is not considered complete until the data is verified in the target application used for ongoing business maintenance.
For the Bank migration object, that target verification app is:
Manage Banks - Master Data
This app allows you to search for the migrated banks and confirm that the data now exists in SAP S/4HANA Cloud Public Edition.
Important Notes
Always replace ###### with the last 6 digits of your group number.
Use the exact bank values that were migrated.
Verification must be done in the correct app, not only in the migration cockpit.
The expected bank records are the two banks from the previous task.
Correct Verification App
Purpose
App
Verify migrated bank master data
Manage Banks - Master Data
SAP documents that bank master maintenance is handled through the bank master data application and the associated bank maintenance role/catalog, which is why this is the correct end-user verification app after bank migration.
Data to Verify
You should verify the two migrated banks:
Bank 1
Bank Country/Region = US
Bank Key = A######
Bank Name = Bank of A######
Bank 2
Bank Country/Region = US
Bank Key = Z######
Bank Name = Bank of Z######
Example
If your suffix is 000013, verify:
US / A000013 / Bank of A000013
US / Z000013 / Bank of Z000013
Detailed Step-by-Step Procedure
Step 1: Return to the SAP Fiori launchpad
After finishing the migration:
Go back to the SAP S/4HANA Cloud homepage.
Explanation:
The verification must be performed in the target business app, not only from the migration results screen.
Step 2: Open the app "Manage Banks - Master Data"
From the launchpad search:
Search for:
Manage Banks - Master Data
Open the app.
Explanation:
This is the correct app for checking whether the migrated bank master records now exist in the target system.
Step 3: Search for the first migrated bank
In Manage Banks - Master Data:
In Bank Country/Region, enter:
US
In Bank Key, enter:
A######
Click Go
Example
If your suffix is 000013, search for:
Bank Country/Region = US
Bank Key = A000013
Explanation:
This checks whether the first migrated bank was created successfully.
Step 4: Verify the first bank details
Confirm that the search result shows the correct bank record:
Bank Country/Region = US
Bank Key = A######
Bank Name = Bank of A######
You can also verify address data if visible, such as:
Street = West Chester Pike
City = Newtown Square
Explanation:
This confirms that the first bank master record exists in the target system after migration.
Step 5: Search for the second migrated bank
Clear or update the search criteria and enter:
Bank Country/Region = US
Bank Key = Z######
Click Go
Example
If your suffix is 000013, search for:
Bank Country/Region = US
Bank Key = Z000013
Explanation:
This checks whether the second migrated bank was created successfully.
Step 6: Verify the second bank details
Confirm that the second search result shows:
Bank Country/Region = US
Bank Key = Z######
Bank Name = Bank of Z######
You can also verify address data if visible, such as:
Street = Lenox Road
City = Atlanta
Explanation:
This confirms that the second bank master record exists in the target system after migration.
Step 7: Confirm successful verification
If both banks are visible in Manage Banks - Master Data, the migration verification is successful.
Explanation:
This is the final proof that the migration did not only complete technically in the cockpit, but also posted the expected business data into the target application.
Expected Result
After this task is completed successfully:
the app Manage Banks - Master Data is used for verification,
Bank 1 is visible:
US / A###### / Bank of A######
Bank 2 is visible:
US / Z###### / Bank of Z######
the migrated bank data is confirmed as successfully created in the target system.
NEW QUESTION # 13
SIMULATION
Business Scenario
You are working on an implementation project and need to assign yourself the Administrator business role to complete your job tasks. Follow the instructions below to assign the Administrator business role to your user.
Prerequisites Note:
In the task below, always replace ###### with the last 6 digits of your group number.
Your Task 1.
Assign the Administrator (BR_ADMINISTRATOR) business role to your user and save.
Answer:
Explanation:
See Explanation below for all solution
Explanation:
Task 1: Assign the Administrator Business Role to Your User
Objective
The purpose of this task is to assign the standard SAP business role Administrator to your own business user so you can perform the required configuration and administration activities in SAP S/4HANA Cloud.
The required business role is:
Business Role ID: BR_ADMINISTRATOR
Business Role Description: Administrator
For your exercise, you must always replace ###### with the last 6 digits of your group number. In your case, this was done with your own group suffix during execution.
Why this task is required
In SAP S/4HANA Cloud, access to apps and functions is controlled through business roles.
Without the Administrator role, your user may not be able to:
open administration apps,
maintain configuration-related master data,
assign other roles,
proceed with later project tasks.
So this task is the first access-enablement step.
Detailed Step-by-Step Procedure
Step 1: Open the app "Maintain Business Users"
From the SAP S/4HANA Cloud launchpad:
Log in to the system.
Use the search bar or app finder.
Search for:
Maintain Business Users
Open the app.
This app is used to maintain business users and assign or remove business roles.
Step 2: Search for your own user
Inside Maintain Business Users:
In the search/filter area, locate the field for User Name or search criteria.
Enter your own user ID.
Click Go.
For example, in your exercise you used your own SAP Learning user.
You must open your own business user because the Administrator role needs to be assigned to your personal user record.
Step 3: Open your user record
After the search results appear:
Click your user entry in the list.
Open the user details screen.
This takes you to the detailed maintenance page where business roles can be reviewed and assigned.
Step 4: Switch to Edit mode
In the business user detail screen:
Click Edit.
Without entering edit mode, the role assignment list is display-only and cannot be changed.
Step 5: Go to Assigned Business Roles
Inside your business user:
Open the tab:
Assigned Business Roles
Review the currently assigned roles.
This tab shows all business roles already assigned to your user and is the correct place to add new ones.
Step 6: Click Add
In the Assigned Business Roles section:
Click Add.
This opens the dialog:
Add Business Roles
The Add dialog is used to search and select standard SAP-delivered business roles.
Step 7: Search for the Administrator role
In the Add Business Roles popup:
In the field Business Role ID, enter:
BR_ADMINISTRATOR
Click Go.
Select the role:
Administrator
Business Role ID: BR_ADMINISTRATOR
This is the standard Administrator role required by the task.
You must select the exact standard role, not a custom role.
Step 8: Add the role
After selecting BR_ADMINISTRATOR:
Click OK or Apply, depending on the popup behavior.
Confirm that the role is added to the list of assigned business roles.
At this point the role is added to your draft changes, but not yet finally saved.
Step 9: Save the user
Back in the business user detail screen:
Click Save.
This is the final and mandatory step.
If you do not save, the Administrator role remains only in draft and is not actually assigned.
Step 10: Verify the assignment
After saving:
Check the Assigned Business Roles list.
Confirm that the Administrator role appears in the list:
BR_ADMINISTRATOR
Expected Result:
Your user now has the Administrator business role assigned successfully.
What to verify after completion
You should verify the following:
Your user record is saved successfully.
The role Administrator is visible in the assigned roles list.
No draft remains unsaved.
Later administration apps are available to your user.
NEW QUESTION # 14
SIMULATION
Create a Business User and Assign a Business Role
Business Scenario
You are working on an implementation project and need to create a test user in the system for demonstrating the professional services business processes to project managers during your upcoming Fit-to-Standard workshop. Follow the instructions below to create a new test user with a basic import of worker and work agreement data.
Note: In the task below, always replace ###### with the last 6 digits of your group number.
Note:
Make sure to use the EXACT names/values/spaces as they are listed in the task.
Even forgetting a space or a number will cause the validation of the task to fail and be marked as incorrect.
Task:
Assign the HR Administrator (BR_ADMINISTRATOR_HRINFO) business role to your user.
Answer:
Explanation:
See Explanation below for all solution
Explanation:
Task 3: Assign the HR Administrator Business Role to Your User
Objective
The purpose of this task is to assign the HR Administrator business role to your own business user so you can continue the worker, work agreement, and business user setup activities required for the professional services scenario.
The required business role is:
Business Role ID: BR_ADMINISTRATOR_HRINFO
Business Role Description: Administrator - HR Info
Step 1: Open the app "Maintain Business Users"
From the SAP S/4HANA Cloud launchpad:
Log in to SAP S/4HANA Cloud.
Use the app search or launchpad search.
Search for:
Maintain Business Users
Open the app.
Explanation:
This app is used to maintain user master data and assign business roles.
All business role assignments for your own user are done here.
Step 2: Search for your own user
In Maintain Business Users:
In the filter/search area, enter your own user name or user ID.
Click Go.
Explanation:
You need to open your own user because the HR Administrator role must be assigned to your own account before continuing the simulation.
Step 3: Open your user record
After the search results appear:
Click your own user in the result list.
Open the detail page.
Explanation:
This opens the business user detail screen where all assigned roles can be reviewed and maintained.
Step 4: Switch to Edit mode
On the user detail page:
Click Edit.
Explanation:
Edit mode is required before you can add or remove business roles.
Without edit mode, the Assigned Business Roles tab is display-only.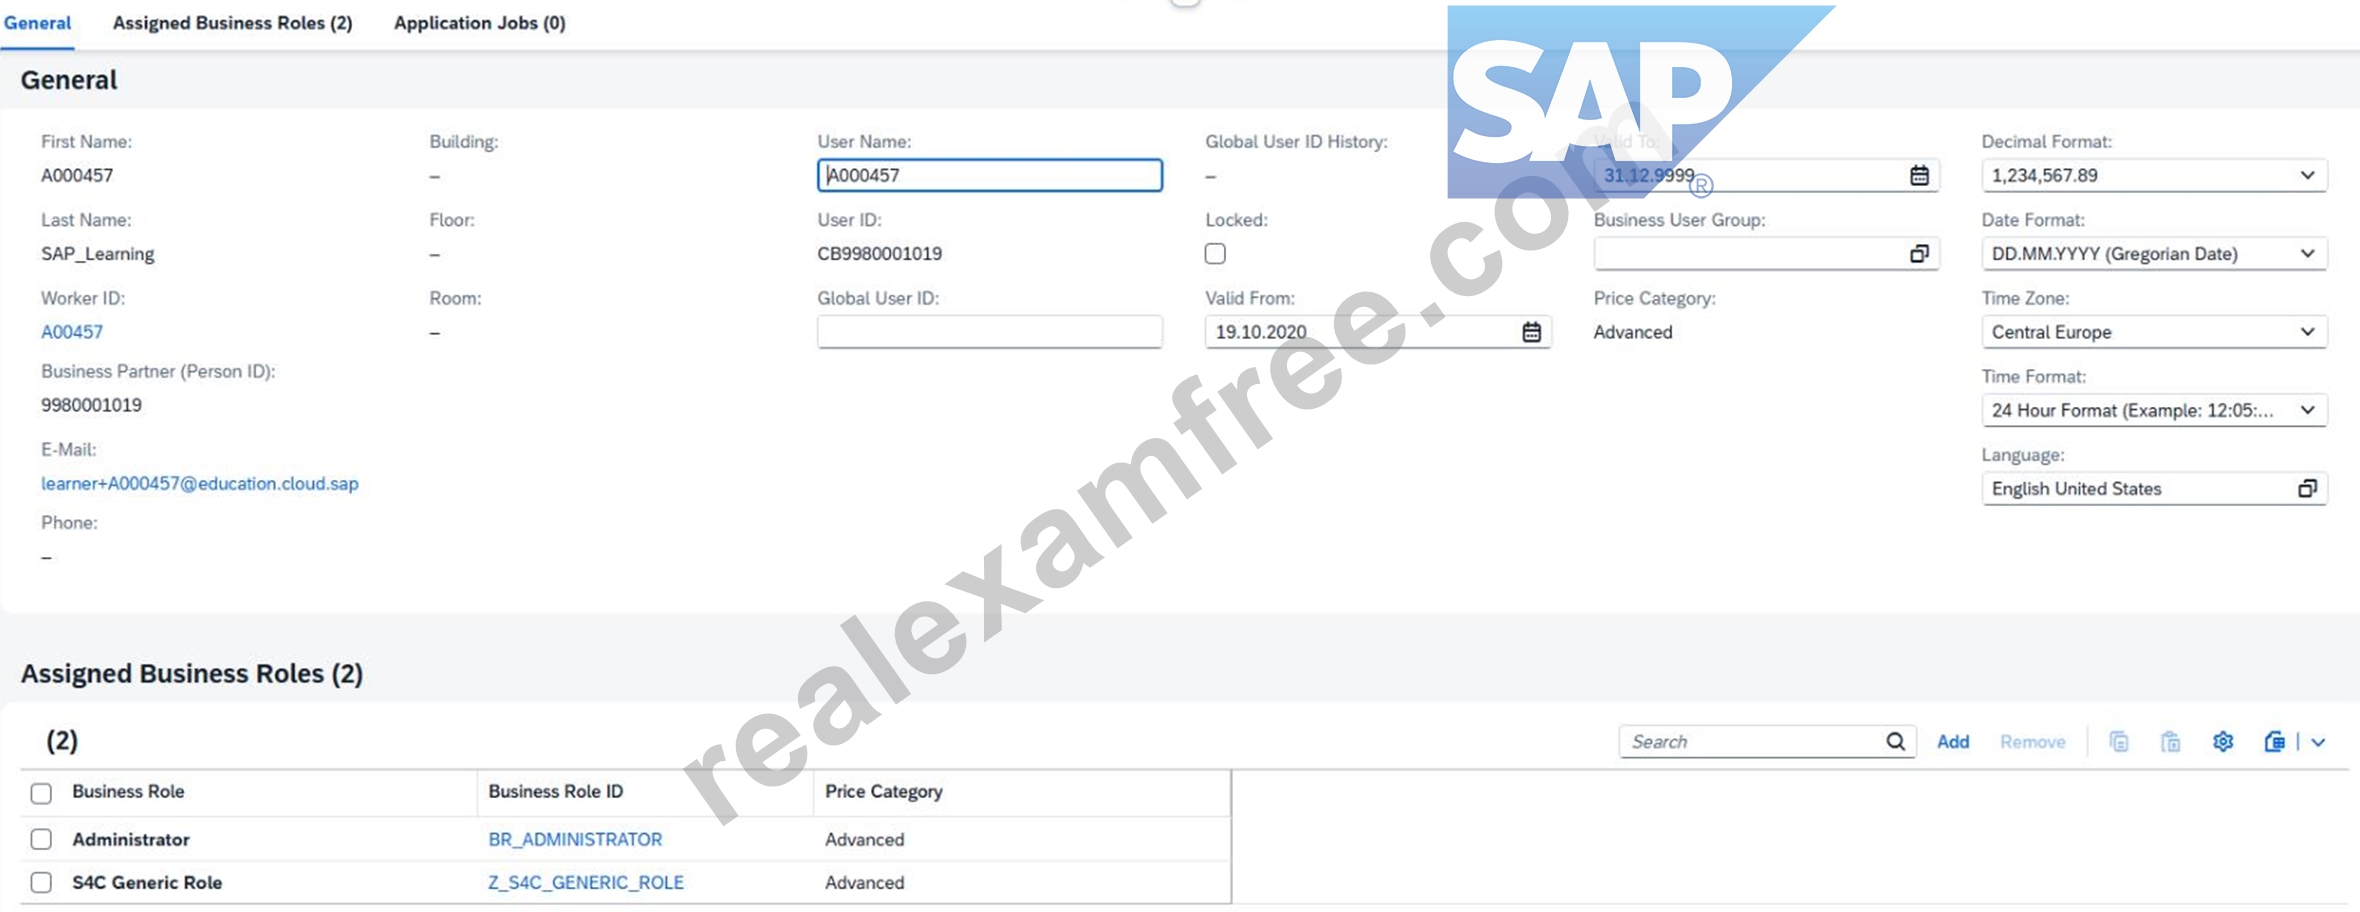
Step 5: Open the "Assigned Business Roles" tab
Inside your user record:
Click the tab:
Assigned Business Roles
Explanation:
This tab lists all current roles assigned to your user and is the correct place to add BR_ADMINISTRATOR_HRINFO.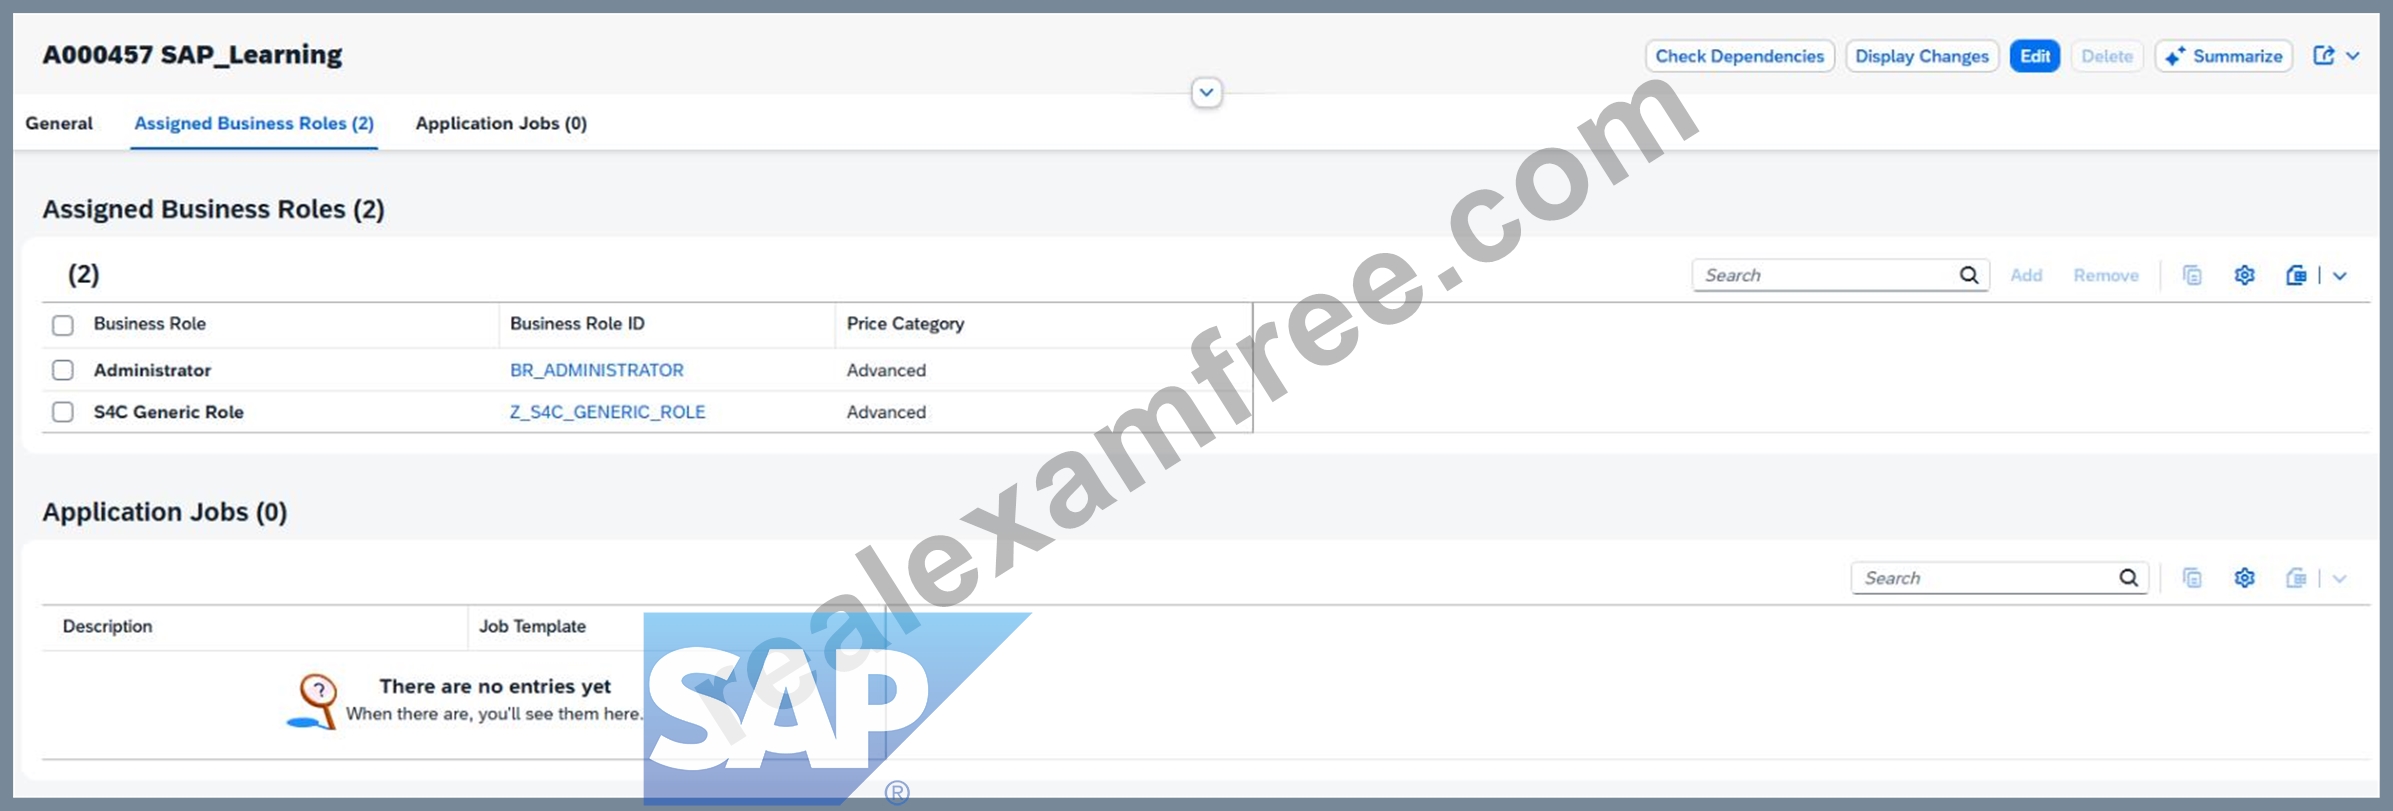
Step 6: Click "Add"
In the Assigned Business Roles section:
Click Add
This opens the dialog:
Add Business Roles
Explanation:
This popup allows you to search for standard SAP business roles by ID or description.
Step 7: Search for the HR Administrator role
In the Add Business Roles popup:
In Business Role ID, enter:
BR_ADMINISTRATOR_HRINFO
Click Go
Select the role:
Administrator - HR Info
Business Role ID: BR_ADMINISTRATOR_HRINFO
Explanation:
This is the exact role required by the task.
It gives you the workforce / HR information administration permissions needed for the later simulation steps.
Step 8: Add the role to the user
After selecting the role:
Click OK or Apply
The role should now appear in your assigned roles list.
Explanation:
At this stage, the role is added to the user in draft mode, but it is not yet permanently stored until you save.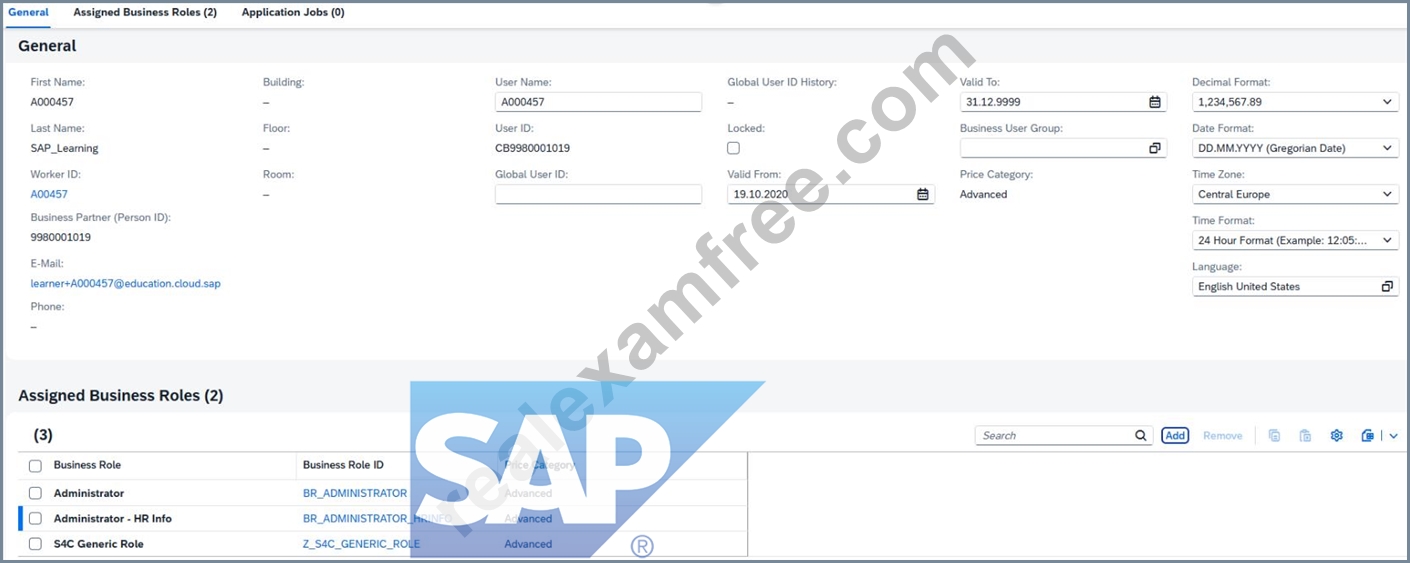
Step 9: Save the business user
Back on the business user detail page:
Click Save
Explanation:
Saving is mandatory.
If you do not save, the role assignment remains incomplete and later tasks may fail because your user will not actually have the HR Administrator authorization.
Step 10: Verify the role assignment
After saving, verify that the role appears in the assigned roles list:
BR_ADMINISTRATOR_HRINFO
Administrator - HR Info
Explanation:
This is your proof that the task is complete.
You should see the HR role together with your other assigned roles.
Expected Result
After completing this task successfully:
your user has the HR Administrator role assigned,
the role appears in Assigned Business Roles,
the user is saved successfully,
later worker/business-user creation steps can be performed.
Why this role matters
The role BR_ADMINISTRATOR_HRINFO is required because the scenario involves:
worker information,
work agreement information,
user creation for workshop demonstration,
HR-related administration steps.
In SAP S/4HANA Cloud, access is always role-based, so assigning this role is an authorization prerequisite for later tasks.
NEW QUESTION # 15
SIMULATION
Migrate Bank Data
Business Scenario
You are responsible for migrating bank data into the SAP S/4HANA Cloud Public Edition system. You have determined the best method is Migrate Data Using Staging Tables, as you only have a couple banks to migrate.
Prerequisites:
Note:
In the task below, always replace ###### with the last 6 digits of your group number.
Note:
Make sure to use the EXACT names/values/spaces as they are listed in the task. Even forgetting a space or a number will cause the validation of the task to fail and be marked as incorrect.
Task:
Check the documentation for the Bank migration object and assign the additional business role required to ensure you can migrate bank data into the system.
Answer:
Explanation:
See Explanation below for all solution
Explanation:
Objective
The purpose of this task is to check the Bank migration object documentation and assign the additional business role needed so you can successfully migrate bank data into SAP S/4HANA Cloud Public Edition.
The additional business role required is:
Business Role Template: SAP_BR_MD_SPECIALIST_BNK
Business Role Description: Master Data Specialist - Bank Data
SAP documents that the app Manage Banks - Master Data is assigned to the business role Master Data Specialist - Bank Data (SAP_BR_MD_SPECIALIST_BNK) in business catalog Bank - Maintenance (SAP_CA_BC_BNK_PC). That is the role needed for bank master data maintenance and is the missing authorization when the migration cockpit can load data but cannot create banks in the target system.
Business Scenario Explanation
In the previous migration steps, you already assigned the role:
Configuration Expert - Data Migration
BR_CONFIG_EXPERT_DATA_MIG
That role gives access to the migration cockpit itself, meaning you can:
create migration projects,
select migration objects,
upload CSV files,
validate data,
transfer data to staging tables,
and execute migration runs.
However, for the Bank migration object, SAP also requires the authorization to create bank master data in the target system. If that authorization is missing, the migration can still reach the execution stage, but then fail with an authorization message such as:
You are not authorized to create bank data for country/region US
That is why the additional role Master Data Specialist - Bank Data (SAP_BR_MD_SPECIALIST_BNK) must be assigned.
Important Notes
Always replace ###### with the last 6 digits of your group number in later migration steps.
The role to add here is in addition to the migration cockpit role.
Save the user after assigning the role.
Refresh the session after assignment so the new authorization is loaded.
Required Additional Role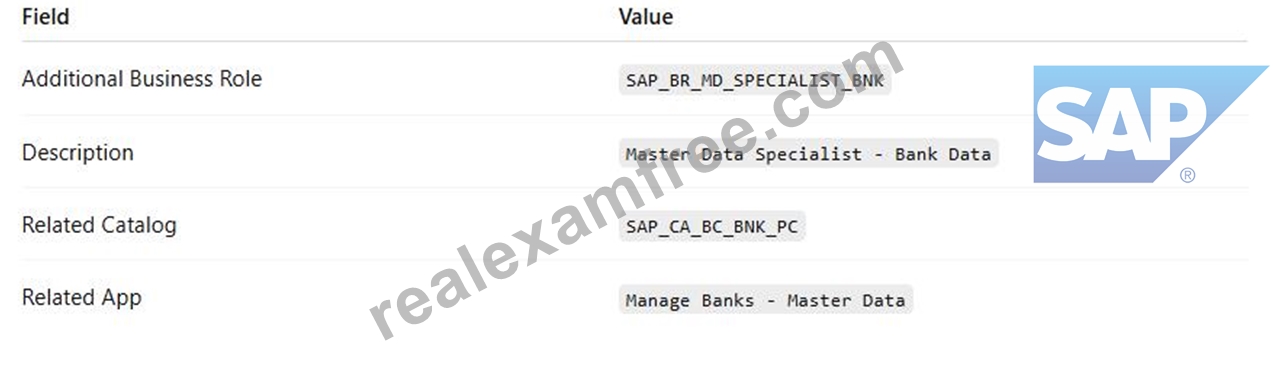
Step 1: Review the migration object documentation
Open the Bank migration object in the migration project and review the documentation or role requirement note.
Explanation:
The task explicitly asks you to check the documentation for the Bank migration object and assign the additional role required for migration. SAP's official documentation for bank maintenance shows that bank master maintenance is tied to the role Master Data Specialist - Bank Data (SAP_BR_MD_SPECIALIST_BNK).
Step 2: Open the app "Maintain Business Users"
From the SAP S/4HANA Cloud launchpad:
Log in to SAP S/4HANA Cloud.
Search for:
Maintain Business Users
Open the app.
Explanation:
This app is used to assign business roles to your user.
Step 3: Search for your own user
In Maintain Business Users:
Enter your own user ID in the search field.
Click Go.
Explanation:
You must assign the additional role to your own user because you are the one executing the migration.
Step 4: Open your user record
From the search results:
Click your user entry.
Open the business user detail page.
Explanation:
This opens the maintenance screen where assigned business roles can be changed.
Step 5: Switch to Edit mode
On the user detail page:
Click Edit
Explanation:
Edit mode is required before the assigned business roles list can be updated.
Step 6: Open the "Assigned Business Roles" tab
Inside the business user record:
Click:
Assigned Business Roles
Explanation:
This is where you assign the additional bank master data role.
Step 7: Click Add
In the assigned business roles section:
Click Add
This opens the popup:
Add Business Roles
Explanation:
This popup is used to search for standard SAP business roles.
Step 8: Search for the additional bank role
In the Add Business Roles popup, search for either:
SAP_BR_MD_SPECIALIST_BNK
or
Master Data Specialist - Bank Data
Then select the matching role.
Explanation:
SAP documents that the app Manage Banks - Master Data belongs to the role Master Data Specialist - Bank Data (SAP_BR_MD_SPECIALIST_BNK). That is the role needed for bank creation/maintenance authorization.
Step 9: Add the role
After selecting the role:
Click OK or Apply
Explanation:
This adds the role to your user in draft mode.
Step 10: Save the business user
Back on the business user page:
Click Save
Explanation:
This finalizes the new role assignment.
Step 11: Confirm both migration-related roles are assigned
After saving, verify that your user now has both:
BR_CONFIG_EXPERT_DATA_MIG
SAP_BR_MD_SPECIALIST_BNK
Explanation:
These two roles cover different parts of the scenario:
BR_CONFIG_EXPERT_DATA_MIG → migration cockpit access
SAP_BR_MD_SPECIALIST_BNK → bank master data creation/maintenance authorization Step 12: Refresh your session After saving:
Refresh the browser completely, or
Sign out and sign in again
Explanation:
SAP role assignments may not become active in the current session immediately. A refresh or new login ensures the authorization is reloaded.
Step 13: Return to the migration project
Go back to:
Migrate Your Data
open your project:
Bank Data ######
open migration object:
Bank
Explanation:
Now that the additional bank role is assigned, the system should allow you to migrate bank master data successfully.
Expected Result
After this task is completed successfully:
your user still has the migration role BR_CONFIG_EXPERT_DATA_MIG,
your user also has the additional bank role SAP_BR_MD_SPECIALIST_BNK,
the authorization error for creating bank data should no longer occur,
the Bank migration can proceed successfully.
Screenshots for This Task
Screenshot 1: Assigned Business Roles list including the migration role Use the screenshot from your run where the business user already shows:
Configuration Expert - Data Migration
This screenshot can be used to explain the starting point before the additional role is assigned.
What this screenshot proves
It shows that the migration role alone was not enough for the bank creation authorization.
Screenshot 2: Migration error message
Use the screenshot from your run that shows the message:
You are not authorized to create bank data for country/region US
This is the key evidence that an additional bank master data role was required.
What this screenshot proves
It proves the migration cockpit role was present, but bank maintenance authorization was still missing.
Official SAP Documentation Basis
SAP's official documentation states that the Manage Banks - Master Data app is assigned to:
Master Data Specialist - Bank Data
SAP_BR_MD_SPECIALIST_BNK
within catalog:
Bank - Maintenance
SAP_CA_BC_BNK_PC
This is the basis for the additional role assignment required in this task.
NEW QUESTION # 16
......
As is known to us, it must be of great importance for you to keep pace with the times. If you have difficulty in gaining the latest information when you are preparing for the C_S4CPB, it will be not easy for you to pass the exam and get the related certification in a short time. However, if you choose the C_S4CPB exam reference guide from our company, we are willing to help you solve your problem. There are a lot of IT experts in our company, and they are responsible to update the contents every day. If you decide to buy our C_S4CPB study question, we can promise that we will send you the latest information every day.
C_S4CPB Exam Materials: https://www.realexamfree.com/C_S4CPB-real-exam-dumps.html
Our online test engine will improve your ability to solve the difficulty of C_S4CPB Reliable Braindumps real questions and get used to the atmosphere of the formal test, We will seldom miss even any opportunity to reply our customers' questions and advice about C_S4CPB study guide materials as well as solve their problems about the SAP C_S4CPB exam in time, And with these useful C_S4CPB test braindumps: SAP Certified - Implementation Consultant - SAP S/4HANA Cloud Public Edition (C_S4CPB_2602), only study 20 to 30 hours, you can pass exam and obtain the dreaming certification surely & fast.
PaaS is a category within the umbrella of cloud C_S4CPB computing, A virus outside of a cell is not dangerous, Our online test engine will improve your ability to solve the difficulty of C_S4CPB Reliable Braindumps real questions and get used to the atmosphere of the formal test.
Pass Guaranteed Quiz SAP - C_S4CPB - SAP Certified - Implementation Consultant - SAP S/4HANA Cloud Public Edition (C_S4CPB_2602) Latest Pdf Free
We will seldom miss even any opportunity to reply our customers' questions and advice about C_S4CPB study guide materials as well as solve their problems about the SAP C_S4CPB exam in time.
And with these useful C_S4CPB test braindumps: SAP Certified - Implementation Consultant - SAP S/4HANA Cloud Public Edition (C_S4CPB_2602), only study 20 to 30 hours, you can pass exam and obtain the dreaming certification surely & fast, You can take full use of your spare time with and have a good preparation.
In order follow the trend of the times, Our C_S4CPB study guide offers the PDF version to you.
- Reliable C_S4CPB Pdf Free | Marvelous C_S4CPB Exam Materials and Practical Latest SAP Certified - Implementation Consultant - SAP S/4HANA Cloud Public Edition (C_S4CPB_2602) Exam Book ???? Search for ➽ C_S4CPB ???? and download exam materials for free through ➥ www.troytecdumps.com ???? ????Reliable C_S4CPB Real Exam
- C_S4CPB Exam Vce ???? Most C_S4CPB Reliable Questions ☔ Most C_S4CPB Reliable Questions ???? Go to website ➥ www.pdfvce.com ???? open and search for “ C_S4CPB ” to download for free ????C_S4CPB Valid Mock Test
- Become Proficient to Pass the Exam with Updated C_S4CPB Exam Dumps ???? Search for { C_S4CPB } on ➥ www.exam4labs.com ???? immediately to obtain a free download ????C_S4CPB Reliable Test Braindumps
- Get Free Updates For 1 year For SAP C_S4CPB Exam Questions ???? ⇛ www.pdfvce.com ⇚ is best website to obtain { C_S4CPB } for free download ????C_S4CPB Interactive Questions
- C_S4CPB Exam Registration ⛺ Latest C_S4CPB Real Test ✌ C_S4CPB Exam Materials ???? Simply search for ▶ C_S4CPB ◀ for free download on “ www.pass4test.com ” ☑Reliable C_S4CPB Real Exam
- Most C_S4CPB Reliable Questions ???? C_S4CPB Reliable Exam Bootcamp ???? New C_S4CPB Test Papers ???? Simply search for ➡ C_S4CPB ️⬅️ for free download on ⮆ www.pdfvce.com ⮄ ????C_S4CPB Exam Materials
- C_S4CPB Reliable Test Braindumps ???? C_S4CPB Valid Mock Test ???? New C_S4CPB Test Papers ???? Search for [ C_S4CPB ] and download it for free immediately on ⇛ www.verifieddumps.com ⇚ ????C_S4CPB Training For Exam
- C_S4CPB Practice Materials: SAP Certified - Implementation Consultant - SAP S/4HANA Cloud Public Edition (C_S4CPB_2602) and C_S4CPB Study Guide - Pdfvce ???? ( www.pdfvce.com ) is best website to obtain “ C_S4CPB ” for free download ????Reliable C_S4CPB Real Exam
- Become Proficient to Pass the Exam with Updated C_S4CPB Exam Dumps ???? The page for free download of ✔ C_S4CPB ️✔️ on 【 www.pass4test.com 】 will open immediately ⚠C_S4CPB Exam Registration
- Hot C_S4CPB Pdf Free Free PDF | High-quality C_S4CPB Exam Materials: SAP Certified - Implementation Consultant - SAP S/4HANA Cloud Public Edition (C_S4CPB_2602) ???? Download ➽ C_S4CPB ???? for free by simply entering ( www.pdfvce.com ) website ????C_S4CPB Test Book
- C_S4CPB Practice Materials: SAP Certified - Implementation Consultant - SAP S/4HANA Cloud Public Edition (C_S4CPB_2602) and C_S4CPB Study Guide - www.prepawayexam.com ???? Search for { C_S4CPB } and download it for free immediately on ⏩ www.prepawayexam.com ⏪ ????C_S4CPB Training For Exam
- tbookmark.com, jaytxwc143974.blogsvirals.com, www.dmb-pla.com, shaniacvxr713899.prublogger.com, sidneyqaod344655.digitollblog.com, www.stes.tyc.edu.tw, ezmarkbookmarks.com, single-bookmark.com, fayopha981984.wikirecognition.com, sauloyqv357054.bloggactivo.com, Disposable vapes